Sunday, November 3, 2013

Post-Halloween

Happy Late Halloween peeps!

This week I started on a new design for my next canvas, woo-hoo! I got some time for myself this weekend and I just went for it. My theme for this new canvas is a sort of Native American thing, with totem poles and eagles and maybe a nice Aztec graffiti in the middle. I started the graffiti part yesterday not knowing it would become anything like it is now. I was just doodling about a hippie-type graffiti...thing and just trying something new, but today I was looking at it and I just had this light bulb moment that hey, this thing HAS GOT TO have a totem pole next to it- and so I found my inspiration. And here it is:


As you can see, I haven't filled in the background yet like the graffiti, since I've just been sketching it for the past few hours and I realized that I was running out of time to write this weekly blog post. First I was going to plot the totem behind the letters, but I had some expert advice which got me to change my mind to just have it hanging there next to the letters. Since the totem was on the left, I needed something to balance out the piece and what could be better to keep company to my lonely totem than a big old eagle! It's a work in progress, I still have to tweak some minor aspects. 


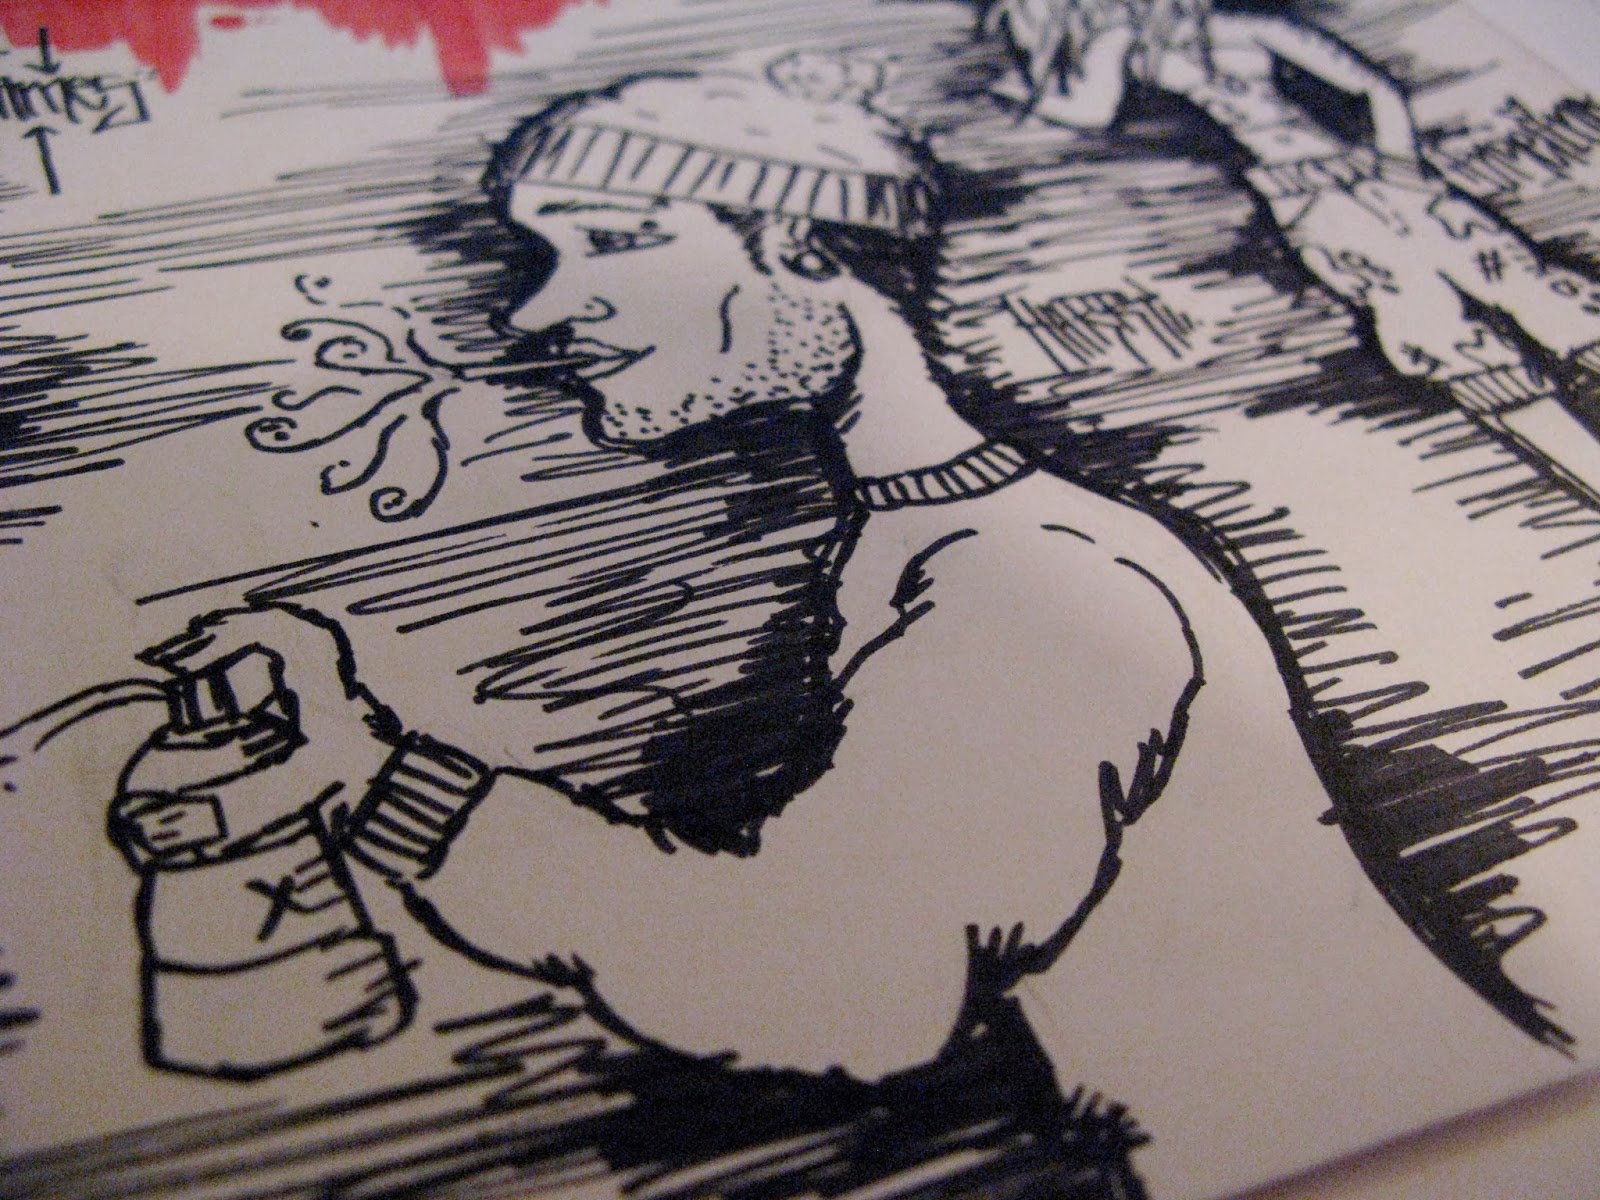
 It's just the basic "REZ" again, I want to keep working it until I find perfection or until I just get bored to death by it. I haven't been using this for long, maybe for a few months now. I've tried to achieve this hippie, folksy look that would bring a good old retro feeling to this piece, just to balance out the last cold, metallic piece. I have trouble with drawing smooth lines and roundish letters, somehow I can't find a way to make them pretty. Other people do a great job with it, I just don't have the patience. I believe sharp lines and shapes are what make graffiti unique. I have included a few round shapes, to even out some sharp edges that needed softening. 
I couldn't remember what a totem pole looked like in real life, so I had to google it. I love these things: the faces, expressions, the detail - everything! The art that goes into it is just magnificent and beautiful, every totem has its own story. Anyways, I used this one as a model for my piece, I wanted something authentic, not just what I made up in my head, even though that would have probably been better. Maybe next time!

Here is the eagle that I am using as a guide. Mine will be a simplified version, of course. I think my background will also be a beautiful blue like this picture has, it won't take too much attention but it will bring out the other colors nicely - hopefully. 

After the planning, I have to start making my canvas which includes  a lot of measuring, sawing and gluing.  Next week I will be ready to go. Yey!


Oh and have you seen my artist's studio?

-The balcony.

It's cool, it's cool.. As you can see I've got no space and during the winter it really can be a pain. But for art I will suffer!


To conclude this weeks post, I want to leave you guys with this great line that has stuck to my head for good.


  Great right? I find this so true, even when I look at my very artistically talented and gifted friends, who find the smallest errors in their works and fall in to a funk because of it. A true artist will keep going until they find their perfection. It's truly like trying to find your inner peace or zen - almost impossible. Remember the 10,000 hours friends! Great artists aren't great because they were born great, they are great because of years and years of passion and practice. 

'Till next week then!

Sunday, October 27, 2013

My Markers

Hello folks!

   I haven't done much this week but anyways I figured that I won't let that bring me down - I thought I'd introduce you to my magic makers..I mean markers. Today I started working on a request made by a fellow instagrammer, who kindly asked me to write his name in pretty letters last week. I've been on a more wild style path, so today I decided to make it as simplistic in colors and text as I possibly can.. Bear with me, it's not finished, I haven't decided on a background yet, maybe that will be something more complex. I have a tendency of being lazy like that but it's all good.
   Yes, as fun as chit chat can be, let's begin.


"Wizard Sk8" - Like I said, it is very simple and there is not much to it, but I haven't used my Basic Sketchers in ages so I thought that hey, why not. So, this is where I've got this week.. Next week I will put some more effort in, this took about 15 minutes to whip up.


Next up: Diddly-doo... Markers!


 Here are my ba... ahem, markers featuring Molotow Basic Sketchers (with a pretty Christmas tree bringing up the holiday spirit just for you - winky-face) on the left and One4Alls on the right. Beautiful, aren't they?  


   This week I wanted to talk a bit about the equipment I use in more detail. I am indeed a loyal customer of Molotow, I do believe their markers and paints are the best you can get around here in Finland. When I was getting into graffiti, about an year and a half ago, I was using the basic markers you get from the closest art shop near my house, I mean, they aren't bad, but if you really are serious - which I aspire to be not to say that I am in any way - I do strongly believe that paint-based markers work the best: great coverage, color and easy use.


Here are a few sketches that I've made in the past months and days with the Basic Sketchers:

12-piece sets
Two tips- flat and slim. And they are alcohol-based.
(I'm really trying to make it pretty... This blog thing is difficult to work I tell you.)


 If there is something that I absolutely love to do other than graffiti, is most definitely drawing side profiles of made up characters. Meet Harry. 


  "Tile" - The Basic Sketchers are great if you want to draw up something quick or if you are planning on a new project, you won't have to waste your good paint-based markers on rough plans. You can also get a great effect with the flat tip for the background - it's simple but effective. 


 Ah yes, now my favorites, One4Alls.

Acrylic-based hybrid paint. 

You get three choices: 3,5 mm tip (large), 2 mm tip (fine) or 1 mm tip (extra fine)


 The outcome with the use of these markers is quite different than with the basic sketchers and thus, they are more canvas-material.
 I use a lot of fading in my works to get more depth and a certain realistic feel to it. With the paint-based markers I find it easy to alter the surface a great deal, creating something new just by using your fingers or maybe a stick that you found from the bottom of your closet.

   I don't believe you need any fancy spatulas or whatever to make your work somehow 'credible' - it's all in your imagination. This is essentially the way I go about it. For instance, with my 'robotic' peace above, I found this old supposed-to-be bamboo curtain from my balcony and so, to achieve the griddle look, I cut the wood in the curtain to pieces and placed them on my canvas and... Ta-da! Griddles! So, I went kind of crazy after that as you can see.. However, I do think you need some good paints and a great idea to get yourself motivated and rolling. ;-)

 Anyways, that is all the insight you are getting this week to my equipment and thought-process, I have got to leave something to myself don't I?

Sayonara folks! Maybe next week will be something Halloween-oriented....


Sunday, October 20, 2013

Getting Started.

Hey folks!
   This is my first blog update ever and I've never actually read an entire blog so please don't judge me, I am new to all this modern cyber blogging...whatever it is. So, let's begin; I'm from this very tiny, cold and unheard place called Finland and no, there are no polar bears or igloos here - do NOT believe those fools who tell you otherwise. Oh, and I'm not actually Finnish but American and I go to an international school hoping to move to the States to reunite with my family next year and perhaps apply to a nice art college in Philly, PA. The reason why I started this blog is because I wanted to find a place where I could share my artwork - finished or in progress - and get feedback or just find people who are doing the same as me. I am heavily street art (mainly graffiti) oriented, so you will just have to bear with me until I find something new to obsess on. Anyways, this blog isn't about my life, clothes, animals or food - it's about art and that, my friends, is it.

To get started, I thought I would upload a few of my works to present to you:

OH RIGHT! I mainly use Molotow One4All markers and spray colors (not to commercialize but these babies work like a charm when used correctly). I've also started building my own canvas frames, this enables me to make my piece in any size I like, which is actually really great. AND another bonus is that making your own canvas frames is sooooooo soo soo much cheaper than buying a built one - for you who like to save a buck or two - and it's not even that difficult to do. I highly recommend it to you.

"tile" - My first canvas ever.
Spring 2013

"Raoul" - For my dear friend Ida.
Fall 2012

"Miia" - For another dear friend, sorry about all the fuzziness.
Summer 2013
                                   
Hippie shoes I made in the spring, the left shoe is the finished product, the one on the right is the original. Only 20 euros for the pair! I had to do something to them... They were just too boring.
Spring 2013
                                     

"Jaun" for a fellow Instagram artist.
Winter 2013

"Tile" - A school project and a name I used to go by. I have to say, my original plan looked much better.. Oh well. 

Winter 2013

"Hi-Rez" 3 - Piece project just for fun, got to try new things, eh?
Summer 2013

The Green Man

"Hi-Rez" - the name I like to go by (Rez for short)

I haven't come up with a name to this fellow quite yet, but I think you will be seeing him in the future.

And now ladies and gentlemen, we will get to the REALLY state of the art stuff. I present to you my latest piece, finished just a few days ago.....
                                
"Rez" - This is the biggest piece I've done so far. I tried to be creative with the background and basically just go with what feels right - and this is what was produced. The letters are actually quite simple and modest to my taste, I usually like my graffiti to be unable to read- I think it's better for the viewer can interpret it in their own way, not mine. Unfortunately I do not have any pictures of my progress, mainly because I didn't know I was starting a blog during the time. Sorry! 
Fall 2013

Well, that is nearly not the end of my projects but I shall post them here when I find a decent one, but that is all for now...