Sunday, March 16, 2014

Sleepy Dog - Almost There

Still working on the Sleepy dog... I know, I know it has been taking me forever like any other project but I do have a eligible reason I assure you! I have been incredibly busy with my school work and other things which happens to be my excuse for this week's slow progress. I am not just slacking off twenty-four seven believe you me!  Anyway, I'll go straight to the point without wasting anyone's time; below is the mind-jogger for ya's of the progress I made last Sunday with the Sleepy Dog project:


I was pretty much left off on the table, which I continued to struggle with pretty much all day today - and still with unsatisfying results. You can imagine my frustration. After struggling for an hour or so, I decided to start over the whole table top idea, which meant getting rid of the little sparks since they don't seem to do it for me this time. As my second  try, I just tried to approach the table again with a simple eye and not focusing too much on the smaller aspects but to get the glares and shades correct which incidentally took me long enough led alone the details. 

After simplifying my table top I went deeper into the detail on the background, coffee pot and the dog itself, adding a fur-like texture to it as I went. I darkened the coffee in the coffee pot with a solid black and added some texture to the wooden boards on the wall with a smaller brush-size (using the Airbrush)


 I can't say I'm too happy with the outcome of the paws, I wanted them to look more rugged instead of a clean, non-realistic look that they occupy now. I guess I will have to tackle them again later on, I cannot focus on one thing too long without good results. What I do have to admit is that I got so frustrated with the table top that I just have to take a break from it for awhile. I have literally tried everything: new layers, textures, brushes you name it I've done it. I just cannot understand why it is so difficult, maybe I'm just out of practice or something along those lines. 

Now that I was getting into the groove in a sense, I managed to pull in the lines on the coffee pot which means good bye blurry lines! I also got to do a bit of work on the hand (pretty much that now you can now actually distinguish it as a human hand) and I added a little detail onto the backrest, particularly in the left corner. I decreased the size of my brush to around 2-3 and added a few creases to the leather pillows to give a signal if you will of wear and tear. I have to say, there is not much left for me to do other than petty detail and I will be finished with this work.. Finally! 


Above you can see the mentioned progress on the pillow, coffee pot and overall compared to the first image, everything is more tightened up and working together as a whole. It may not seem like I have done much but I assure you, it takes the longest to do the finer details. Again, I've been using the Airbrush throughout this project - don't ask me why I just have a keen attachment to it - and it works quite well. It's difficult for me to identify when this project will be finished because I can always see some petty little faults in here that I just can't get over with until I get so unbelievably bored with the project that I have to start something new.

 I am almost there just bear with me for another week! So close but so far.. My last task now is to finish the table top and touch up the paws and I will be D O N E! Next week I hope to start something new, so we have that to look forward to. 

Sunday, March 9, 2014

Sleepy Dog - II

Guess who's back.. Back again. 

As you know, last week I began working on a new so-called 'project' with the Sleepy Dog and this week I'm continuing on that topic. It's still not quite finished, a work under progress indeed. Below you can see where I was left off last weekend just as a quick reminder;


It's still fuzzy due to the brush I am using - so don't worry, you don't need glasses - and will continue to be fuzzy throughout this post so just beware, I am not that far along yet. This week I decided to tackle the rest of the wall, begin working on the table top and do a little detail work on the dog itself.  

First of all, I finished the wood panel work and the sign on the wall to the extent that I won't have to return to it until the 'fine detail' stage and you can see below how I have added a yellowish color to the diner sign in order to make it look beat up and old. I also retouched the wear & tear marks on the letters. After doing this, I went on to tackle the coffee pot, which is quite tricky with the glares and the distorted figures and I still haven't finished it for good, I had to remodel the coffee pot a bit since it looked a bit deformed to be a functional coffee pot. I added some color to the hand holding the pot and added detail to the dog's face and fur with a finer brush. 


I still have a lot of work to do around the areas mentioned earlier, but I won't get back to them until I have somewhat finished the table top and worked on the dog's paws - which dare I say are perhaps the most challenging part of this whole project. I have made an effort below to begin on the table but it's still not up to my liking, I really do want that glare that you get on those old fashion table tops in diners. 


Above I have started working the table top by setting my brush to a size around 5 and began dabbing away at the table, giving it a more 'marble' - if you can call it that - type of look, which hasn't worked out too well for me so far. I added a new layer just in case I decide not to commit to the changes I've made and I set the opacity to about half, so I can use darker and lighter colors without altering the bottom layer too much. I do admit that I have been thinking about just leaving it more fuzzy but then again I really do wish to make it look credible so I think I will just have to leave it for next week's post. 

 I've started working on the paw on the left, which turned out to be a challenge as well, I'm finding the shadings particularly difficult and I haven't even began on the right paw but I do believe that it will be easier, since it won't need as much shading as the left one. Those pesky things.. 

Anyway, below you can see where I am left off now and will be continuing from next Sunday..

I've managed to begin on the right paw/leg and I've smoothed the shadows on the table; I haven't gotten too much further from the previous image unfortunately. Now, if there is anything I absolutely hate to draw or paint that just has to be mugs. They are so simple but so complex! I can never get the form correct to make them look realistic which is the worst part of it all. I mean, you'd think they would be a piece of cake to draw right? I think I might be the only one facing this type of problem; for crying out loud who in the world simply cannot paint a mug? However, I will do my very best to try, just for you. 

All in all, I can say that I am almost satisfied with the background and the dog's head, which won't need too much work anymore other than a few final touches and a little tightening up for the lines. You can't see much difference when it comes to where I was left off last week but believe you me, I have put about 4 hours into this, I honestly don't know why it is taking me so long to make such slow progress. The color images tend to throw me off a bit I guess. However, I do want to keep this painting on a more 'painterly' basis instead of a realistic representation which allows me quite a bit of freedom when it comes to the table top and the dog; always a good thing when it comes to my preferences. 

I'm sad to say that this is all for this week, next week I hope to have this project finished and starting on something fresh and maybe slightly more serious. Tune in next Sunday!

Sunday, March 2, 2014

The Sleepy Dog


This week I was re-cooperating from the Indian Child project, so I wasn't being very productive during the week until about Friday when it came time for me to do something productive and practice my drawing skills which indeed is when I started thinking about the next project I would tackle head on. I've got to admit, it took me awhile since I didn't really want to continue on the same theme of Indians and such so that I would stay somewhat interesting even though I think the Indian culture is so very fascinating and amazing. However, this time I've been reading up on colleges and information on illustrators and graphic designers and I came across some portfolio requirements on this great school which advised the students to draw animals, not just humans or landscapes. Now, it did also state that they do not appreciate digital paintings as much as they do the regular old fashioned paintings which I do understand but I'm still focusing on mastering the Painter software. So, I went online and searched for 'sleepy dogs' - don't ask me why - and I found a few nice ideas that I thought were good for my purposes. So needless to say, I went head on to sketching something up and began working. 

Alright, so I will just get right to the point. I actually forgot to take some screenshots of vital points in the process but I will do my best to explain them with enough detail that you get the idea. Like always, I begin by taking out a 2B pencil and started sketching a rough outline of shapes and proportions before painting. 


 I was very reckless today, not only did I forget to take screenshots, I also forgot to add a layer for my sketch, so that I could have moved it around if need be. Oh well, fortunately everything worked out well enough. 
Now here are the steps I made and did not document; after finishing my rough outline, I added a new layer on top and began working in black, white and grey before adding color to my image. This is to get the values correct and makes my job more enjoyable and easier to do. I do this grey scale blocking in with a large brush, with the Airbrush again to be exact, and with my opacity set down to 9% by default. After doing this, I flatten the layer and then add a new one. On this new layer, I choose the Paint Bucket Tool and fill it with a solid red color, in this case I used a maroon red variation because I see it in the subject I'm painting. Now I set my layer mode to Soft Light and thus the value painting will show through the red and will look like a 'red wash' over my image. 

Now it's time to get the color palette out and make some action! I created a variation of red, yellow and blue to begin with and I start blocking in the colors in the background and by keeping everything simple and as detail-less as possible. 


After doing this, I begin finessing the background and tightening up the shapes and lines with a smaller brush, still using the Airbrush on opacity of  9%. You still see how fuzzy the whole image, but at the end it (hopefully) come together as I keep reducing the size of my brush to make the needed detail. 


Above I have added some detail to the dog, coffee pot as well as the wooden plank wall in the background. I haven't been able to finish this today, but below you can see where I was left off about two minutes ago:


You can't see much difference except in the background where I have some beginning of a more detailed wall. I do realize the picture is quite corny or cheesy if you will; however the thing that intrigued me was the feeling of the restaurant, I've always wanted to visit one of the run down breakfast/dinner restaurants and I wanted to capture the feeling of it with a light image like this. Besides, sometimes its good to lighten up the mood a bit, am I right? This picture really does remind me of those supposed-to-be funny Donald Duck satires now that I'm really looking at it and not working on it. 

Next week I hope to continue and add more detail to the background and the coffee pot, hopefully I will make it to the dog.. At some point. And well what can I say, I guess that is it for this week - tune in next Sunday to see more progress. 

Sunday, February 23, 2014

Indian Kid - Finished Work

Phew, all finished! As it turns out - like always over here in Finland - when a FINNISH website promises you an ETA (Estimated Time of Arrival) of your purchased product on one day - Monday, in my case - with a 0.1% chance it will arrive on time but on the other hand with a 99.9% chance, your product will arrive five days after that ETA date. So very, very typical.. Anyway, to conclude from this my Painter X3 software arrived on Friday afternoon instead of four days earlier as promised, you can imagine that I had to get to working right away after wasting three quarters of my ski holiday waiting around for that box to arrive. Though I do have to admit, this software right here is worth the wait without doubt.

Anyway, here we go. Last week's outcome:


From here on I just began blocking in the fur and feathers on the right side, which believe you me, took many, oh so many, hours to finesse into something suitable. After developing the fur and adding on all the correct details with all the twists and turns you can imagine that fur has in it, I could begin on the feathers that emerge from the fur. This was actually a very easy and delightful job after finishing that pesky fur, it did not require much detail since most likely it won't be my focus point in the image. Of course, as I was finishing up the fur and adding my feathers, I go distracted and decided to add some color to the picture as I had mentioned in the last post. I added a new layer just to see whether it would work out as well as it does in my head and whether I could make the beeds pop out slightly with moderation of course. You can see the outcome below. 


After doing a few touch ups on the beeds holding the fur and on the fur overall, I had one more task left on this image: the background. This was a task I could execute with ease, I just reset my Digital Airbrush to its original setting with a size of about 50 and opacity of 9-10%. This gives me a nice rounded out brush that will lightly darken or lighten the background however I choose. After getting the shapes right in order to achieve a nice mystical fog look, I whipped out an extremely handy blender tool called the Blur, which allows me to soften up the rough edges of my background mist and works as a space filler instead of grabbing the attention from the Indian kid. Without further ado, I present to you, first of all, my original sketch and then the original work I've just finished working on. Quite a difference ain't it? 


As you can see, my blur tool has worked out quite well with the background without drawing too much attention but still works as a space filler and brings a bit of softness to the picture. I also do enjoy the little light spec that the beeds deliver to the total ensemble. The best thing here is, after adding my signature on the bottom left, I can say that this project is finally FINISHED. Phew, I was ready for something new by now. 

I haven't been able to start anything new today since I got caught up in the last day of the Olympics in Sochi, so that took up my entire day..  Not to say I'm a big sports person, I just think it is my obligation as a human being, I guess. Anyway to conclude, next week I am hoping to begin something new and exciting mostly because I'm really getting used to the software and I think I can take on something fairly serious or even challenging. 

Monday, February 17, 2014

New Software!


On Friday us people in Finland began on our annual 'Ski Holiday', which basically means a week off of school with lots and lots of skiing and ice skating either here in Finland or somewhere else where you've got a lot of snow to downhill ski. Now, last week my Painter X3 trial expired, so I wanted to get some work done before it would expire so that I wouldn't have anything unfinished for the next week or so because I'm waiting on my licensed version of the software to arrive.
 I had planned everything well for Monday and Tuesday to work on the Indian kid 'project' since I had two days left after Sunday to work on the Painter. I ensure you, I did work on it all day Monday and as I closed the program after a good day's work, little did I know that the 1 day I thought I had left and what the program had told me was indeed not true when I came home from my studies on Tuesday. So, I was left with little option to continue and I have to say I'm a bit skeptical about the Photoshop for painting pictures. Anyways, for the rest of the week I've been caught up in school work and this sort of 'Senior Prom' that was going on just a few days ago. Not that I attended, but it was quite hectic for awhile there. 

Anyway, yesterday afternoon I decided to download the Adobe Photoshop Elements, just to get a feel of what it is about and I didn't feel confident enough to download the full on trial version of the Photoshop for the time being. I'll get onto that later, all in all Elements is just a cut down version of the Photoshop just as Painter Lite was to Painter X3. 
For now, I'll just walk you through on what I did on Monday before my Painter expired:

To jog your memory once again, here is the work I was left off with last Sunday. 
Figure 1
Alright, so from here I had to bite the bullet and begin on the 'hairy' of the headdress. I started on this by darkening the bases of the hair and lightening the tips to show where the hair begins and ends and where the feathers enter. Here I use a larger brush because I am in no need of strong detail just yet. 

Figure 1.1
While I was getting into the fur on the headdress, I got extremely distracted as usual and I started putting detail into the headband of the headdress making it darker and giving it a more grainy look instead of a smooth one that it used to show. I also added quite a few wrinkles all around before I could find myself satisfied with the outcome. I used the Airbrush of size 4-5 and turned the opacity down to almost less than half just to gradually darken the color of the headband. I thought this would give the work more contrast and impact overall, I felt it was looking a little bland previously as you can see on the first picture. Below you can see my progress on the headdress more clearly. 

Figure 1.2
After being satisfied with the headband, I began concentrating on the fur again which I really did find quite challenging. It was very difficult making the fur look somewhat real and as it were floating in the air and honestly I'm still not quite sure if I've succeeded. However, after getting the base colors right I could begin on the smaller details and thus I decreased the size of my Airbrush to about 2-3 and began altering the shapes and directions of the hairs to bring them out a bit. I don't wish this part to bee overly detailed, this could take away from the overall composure. I still want the face and the feathers in front to be the main focal point. 

Figure 1.3
After a few hours of work I began to get frustrated on the immense amount of hairs I was supposed to be working on and I decided to distract myself again for a bit and I found some flaws around the picture which I tightened up around the face and added more contrast all around. The main point that caught my eye were the long 'beeds' that held the fur in place. They just seemed a bit too smooth for the picture, and so I added some grain by increasing the opacity and decreasing the size of my brush and I stared dabbing away with lighter and darker shades of grey which gave some texture to the beeds, which I thought helped the image quite a bit. (See difference between figures 1.2 and 1.3)

At this point, it was getting late and I needed to begin on my other duties so I managed to just about finish the fur on top of the child's head and let it go there, hoping to continue the next day and finish the rest of the fur running down his back. But as we know, this did not happen. 

Figure 1.4
And here is the overall result of all my hard work on Monday afternoon. Now, if you compare this outcome in Figure 1.4 and Figure 1, you can see quite a difference in contrast all in all; Figure 1.4 is much darker and detailed overall. Fortunately, I am expecting the arrival of the real deal version of Painter X3 tomorrow, so I'm hoping to get some work done then.

Now, I just downloaded the Photoshop Elements on Saturday and I have to confess, it did not do much for me. I feel as though it's too simple and I need a little challenge even though I'm sure it has plenty in it if I'd just dig in a little further. After fiddling around for a bit and checking out the brushes, templates and filters I opened the Indian Child onto the software. This is what I saw:


You may think that this looks fine here and wonder what in earth am I talking about but I am telling you if you zoom into this picture above you can see all the rough edges and pixels that you cannot see in Painter. I don't know about you but I like my edges smooth and dandy.. I had followed the rules correctly in my mind, I had saved the indiankid.rif (Painter) file as a psd (Photoshop) file and most certainly not as a .jpg file so this confuses me very much. I have read if you save your file as a .jpg you may lose the quality in your work as you duplicate it but I haven't read anything on this. Anyway, this was a big turn off for me in this software and I don't feel to comfortable continuing my work on this.

Anyway, all in all it is an easy software to use and great if you are a beginner as myself in this field of digital art but as it has already been said, this software is made for photo editing and not image creating as I prefer. I'm still going to continue and get familiar with this software as far as I can before I get the Painter X3 in my hands. Wow, I didn't think I could have squeezed a post from this but apparently it is possible!

Sunday, February 9, 2014

Indian kid: Part II

I'll just cut the meaningless chit chat and head right on to my last week's project. If you're not familiar with it, feel free to go back to the post right here -> http://whereisyour-mind.blogspot.fi/2014/02/an-indians-child.html

To rewind to the last post and get you up to speed, I'll just put the picture that I was left off with on the Painter. This is what I was left off with last Sunday working on the Indian Kid.


As you see, It's really in the middle of everything. I still have the feathers and the fur to touch up and add texture and detail to the entire image. Just to remind you, I'm not drawing off a picture, you know, as many people do with the whole digital art world. I've got another screen right next to me with the rough idea of what I am drawing; I just need that for reference to the Indian Headdress since I'm not too familiar with the looks of them in detail. After this, I'm still going to head on with the Digital Airbrush, but what I will change is the opacity and the size of my 'brush'. To add detail to the fur on top of the feathers, I begin by sizing down the brush to about 1.5 and setting the opacity of the brush to about 20-30%, depending on what shade I'm using. 

As I'm working on this picture, I've been mulling around whether I should add color to the image and I'm still yet to make a decision. What I was ultimately planning though was to add some color to a particular area in order to grab the attention of the observer, but I haven't decided what I want my focal point to be so I haven't headed onto add any color anywhere yet. Maybe I will do that as a final touch, perhaps make the star on the headdress shine, ensuring that it captivates the observer. 

I've actually had quite the hectic weekend and I haven't gotten much time until today afternoon to work on the Indian Kid. I guess it really does take me forever to finish anything! 


Anyway, I began working on the feathers and the fur (if you can notice from the picture above) around the kid's head and I discovered that it was actually a lot harder and more time consuming than I had thought. I sized down my brush even further to about 1.3 and pushed my opacity up to about 29%  in order to lift out the thin hairs that are being blown by the wind on the feathers. You can see this progress the best on the feather on the far left. Now, if we go ahead and compare the picture above and the picture I was left off last Sunday, you can see the added detail on the feathers, the don't look as 'sprayed' as they did previously. Additionally, I started adding detail on the face of the kid, by adding eyelashes and improving on my shadings and enhanced the lines above the eye. 


However, despite all my hard work, this is what I am left with now and I guess you can hardly see the progress I made but oh well! Maybe next time, I'm hoping to add some color by then.. 


From this you can see - at least I hope you can see - that I have tightened up my line work and added some more contrast to the feathers, especially the one in between the two spotted feathers, in order to make them distinct from each other. I do think you can see that now the fur looks more 'furry' than in the previous pictures and they float nicely around the child's face. I've also pretty much just added contrast everywhere around the picture - well, around the face - which helps me to envision the final work and begin working on the feathers above child's head. I am not looking forward to tackling that one..

Unfortunately, my trial round of Painter X3 is running out and I'm yet to order the real copy since it's very difficult to get one of those home/student versions here in Finland and the commercial copy costs around 400 euros which is quite a lot for my student budget. However, I have a few tricks up my sleeve to get that Painter and for the time being, I am going to download another trial version next week probably of Photoshop and get myself used to that until I get my Painter running. I'm a bit skeptical about Photoshop since I'm not a real photo editing enthusiast, I like to keep my pictures real without too much false 'beauty' put into them. I we will find out next week how it works out..

My apologies, this post is going to be a bit shorter than the usual since I've only been working on the fur and feathers this week and I've been too swamped to draw anything in my sketchbooks during school times (you know, during skips..). Next week I hope to at least get this done and begin on something new and exciting with the Photoshop. 

Sunday, February 2, 2014

An Indian's Child

Wow, its already February. I've got to get a move on on my New Year's resolutions. 

Now, before I start on my workings during the past week, I wanted to say that yes, I do remember I had started the Robo Man drawing last week and no, I will not be continuing it this week. Frankly, I did have every intention of doing so until I opened it on Painter and just couldn't get the mood for it. Sorry about that. However, this week I've been in a more down to earth mood and thus I have been drawing in my sketchbook during convenient moments at school and home whenever I got the hankering for some led. 

So this week I started on this, a portrait of 'Edward Sharpe' as he is performing in his alter ego, that certainly looks a lot like Jesus holding a microphone and indeed has been mistaken as Jesus several times. Maybe he is, who knows. A modernized one perhaps but you've got to be don't you in the 21st century. 


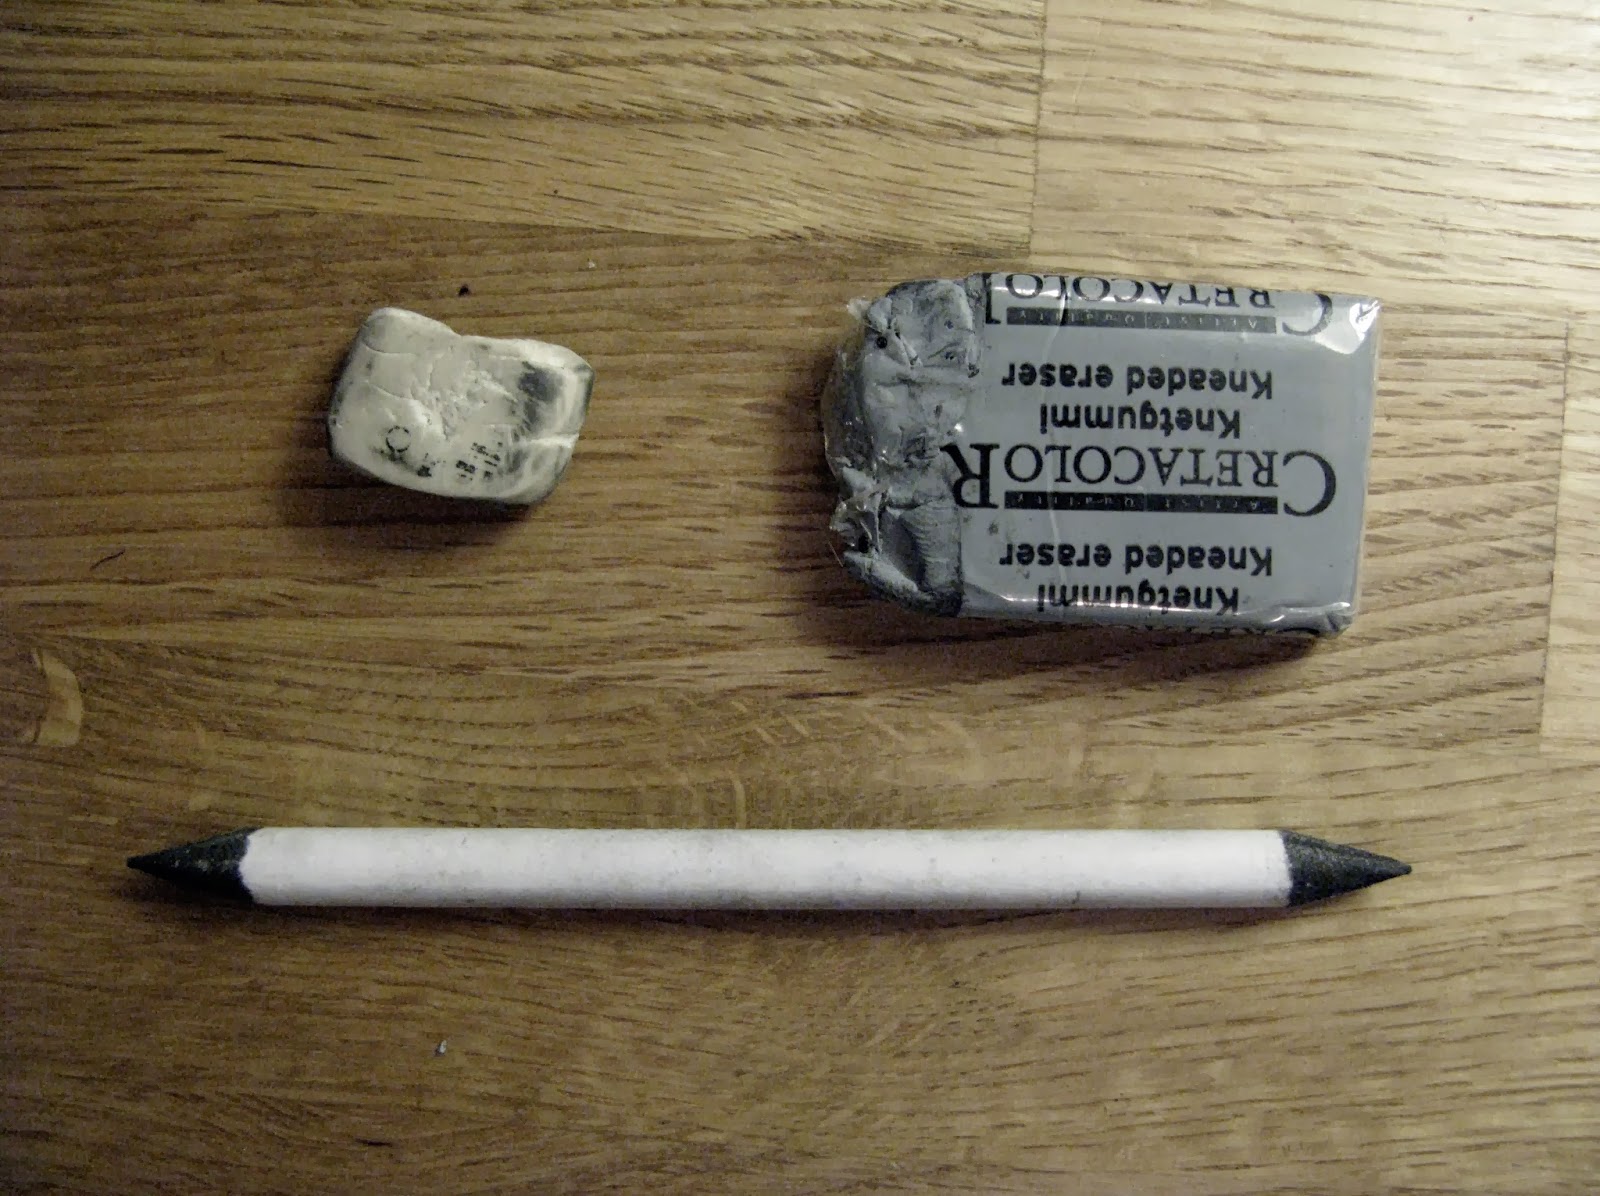
Anyway, Jesus or not, its not quite finished yet because I had to start on other things during the weekend and didn't find the time yet to finish. I will probably finish this doodle during school next week, if I'm lucky enough. Just to talk about something, I thought I would show you my tools for doing this, even though it is a extremely obvious statement. I like to use the 2B graphite pencil the most, don't know why but I feel as though it always does the job and you can see it has been used the most compared to the 2H and 8B. I haven't found the 2H pencil useful, unless I'm working on hair or something with great detail like that. 


My magic makers are my erasers and my smudge tool, ah I

 could not survive without them. These are what make your life so much easier when drawing with graphite pencils: if you use the grey eraser shown below, its perfect for lightening your colors to your liking without ruining your lines or erasing all your work. On the other hand, the more regular eraser that is also harder and thus, more powerful is great for erasing out detail from your darker surfaces and comes into equal need during your process, or at least my process.


To be honest, mostly for smudging I use my own fingers to do the job but of course, I'm a more get down to it person and I don't mind getting my hands a little dirty sometimes in the name of art. It's not for everyone and that is why we have these awesome little pencil-looking things called smudge tools.

Alright, now that that is all dealt and done with, I'm ready to go on to the next subject. Today I started on this project of an Native American child with a headdress on. After watching a documentary last night on Johnny Cash and his performance in one place or another, I saw these Native Americans in the audience listening to his songs and I just got this light bulb moment and I just had to forget everything else and start drawing. It actually does fit nicely along with the totem poles and the eagles that have featured in my past posts, and I've been eagerly working on it since 12 o'clock this morning.
 So, I just downloaded a picture on my phone of a child with a headdress and another one of a woman wearing another type of headdress and I sort of combined the two; I wish I could post the pictures here but I couldn't download them onto my computer since I downloaded the pictures onto my phone from We Heart It and getting the pictures off my phone onto the computer is too much of an hassle for the day.

Anyway, here is the 15 minute sketch I came up with as a guidance. I opened a layer on top of the canvas so that I could move or re-size the sketch if needed. 


After this, I started blocking in the colors by opening another layer under the sketch layer and turning the opacity to about 85-90%. I also set my sketch layer to Multiply, so that I don't lose any sketch lines. For the block, I use a Digital Airbrush that is a round brush without the point. Also, when blocking its important to use a large brush size, so that you won't worry about the details or waste too much time on refining shapes and ideas; the main point is to get the color values right. 


Here, I've blocked out pretty much all the colors I need and I've started on the background. As you can see, I haven't started on much detail and I've kept my color values fairly simple. I found this stage enjoyable, since you don't have to concentrate on getting the shapes or details correct yet, just get the values of dark and light correct and you're half way there. Because I've used the Digital Airbrush, my image looks quite hazy doesn't it? But this is the point: after refining my picture numerous time, hopefully I will achieve the look of haziness but not too much to make you squint your eyes in order to find some detail.
 At this point, I could choose to implement some alternative colors than just black and white in my picture, but I've made the decision to keep it simple and colorless. 

Now it is time to go into some more detail, not to quite all the way to the nitty gritty as you can see in the picture below. I've added a new layer, so that I can start fading away my sketch lines and finding a more specific shape to the facial characters and the headdress. 


You can see that I've started to reshape the ornaments on the headdress and find a general shape to the face and begin to fade away my sketch lines on a new layer. I've also started adding darker shades of gray to pop out the face of the child and bring more life to the whole atmosphere of the picture and you can see how it has gradually lost its haziness at parts of the image. Honestly, I'm quite frightened to begin on the feathers, since they always require so much attention and detail and frankly I'm not good on feathers, my patience just doesn't last that long. But as they say, practice makes best so I try not to complain too much. 

After this stage, I didn't get too far until I had to start on my weekly blog post right here so there's not much difference to the previous picture and the one below except the ornaments or whatever they are on the headdress. They took quite a while to do, believe it or not. 


 I'm actually pretty psyched to see what will come of this. Now, I can't waste too much time blogging since I've got to get back to work and finish this bad boy so that I have something to show next Sunday..